I got this recipe from a friend who lives in America and it is fantastic. I tried another recipe before this and thought that pumpkin pie is just not for me. I changed my mind!
1 1/3 cup smooth pumpkin, 1 1/3 cup sweet condensed milk (1 tin is approx = 1 cup), 1 egg, 1 1/4 tsp cinnamon, 1/2 tsp nutmeg, 1/2 tsp ginger, 1/4 tsp cloves, 1 cup hot water. Pour into 9" pie shell. Bake at 375F 55 to 65 minutes. (Center will still move slightly) Cool and enjoy. (Mashed pumpkin will hold 5 days in refrgerator)
To make the smooth pumpkin I did the following:
Put butternut or pumpkin blocks (about 500g) in a heavy-based pot. Sprinkle about 1/3 - 1/2 cup sugar over and let it stand overnight. It will draw water from the butternut. The next day, let the butternut simmer slowly in the same liquid until soft. Do Not add more water. Only if you see it's going to burn before it's soft, add a couple of tablespoons.
When the butternut is soft, drain it in a sieve and let it stand over the pot for another hour or so to make sure all liquid has drained off.
Use a potato masher and mash the pumpkin very well.
Pie shell:
For the pie shell I made my own sweet shortcrust pastry from Julia Child's first book.
Page 586:
142g (5oz) plain white flour
113g (4oz) chilled butter cut into small pieces
1 1/2 tbsp castor sugar
1/8 tsp salt
4 to 4 1/2 tbsp cold water
Page 127 (instructions for general shortcrust pastry) - Summarized here
Mix flour, castor sugar and salt
Rub the butter into the flour with your fingers until resembling large oat flakes. Do not overdo as butter will be blended in later.
Add water and blend quickly with one hand, fingers held together. Do this until most ingredients are folded into a body of dough.
Press dough firmly into roughly shaped ball. Must just hold together, be plaible but not damp and sticky.
Place dough on lightly floured pastry board (I use a marble one). With the HEEL of one hand (NOT the palm - it's too warm), rapidly press the pastry two spoonfuls bits down on the board away from you in firm, quick smears. This constitutes final blending of fat and flour and is called fraisage. (What a cool word)
With a spatula (or egg lifter), gather the dough again in a mass, knead briefly into a fairly smooth round ball. Sprinkle lightly with flour and put in grease-proof paper (or I put it in a plastic zipped bag). Put in fridge for minimum 1-2 hours.
*** Uncooked pastry will keep 3 - 4 days in fridge or deep-frozen for several weeks ( I LOVE THAT!)
I par-bake my pastry shell following the blind-bake method.
http://www.wikihow.com/Blind-Bake
NOTE: I don't completely bake my pastry (the wiki-link says 15 minutes). I follow Julia Child's instructions, page 131: Bake at 400F (200C) for 8-9 minutes, remove foil with dry beans, prick pastry now and return to oven for 2-3 minutes.
Monday, November 21, 2011
Friday, October 28, 2011
Sugar Cookie Dough (can be frozen)
SUGAR COOKIES FOR THE FREEZER .... FREEZE THEM AT THE LOG STAGE, WRAP WELL AND PLACE THEM IN A FREEZER BAG.
Ingredients
• 1 cup butter
• 1 cup white sugar
• 1 cup packed brown sugar
• 2 eggs
• 1 1/2 teaspoons vanilla extract
• 3 cups all-purpose flour
• 1 teaspoon baking soda
• 2 teaspoons cream of tartar
• 2 teaspoons ground cinnamon
• 1 teaspoon salt
• 1/2 cup chopped walnuts
Directions
1. In a medium bowl, cream the butter with the white sugar and brown sugar. Stir in the eggs and vanilla. Sift together the flour, baking soda, cream of tartar, cinnamon and salt; stir into the creamed mixture. Finally, mix in the nuts. Divide dough into 3 equal parts, shape each piece into a log about 1 1/2 inches in diameter. Wrap logs in wax paper and chill for 3 hours or overnight.
2. Preheat oven to 400 degrees F (200 degrees C). Cut dough logs into 1/4 inch slices and place them on an unprepared cookie sheet. Bake for 8 to 10 minutes, until light brown.
Most cookie doughs freeze extremely well and can be kept frozen for up to 4 or 6 weeks. Use these tips for freezing:
•Double-wrap dough in plastic wrap to prevent freezer burn and absorption of odours from your freezer
•Write the type of cookie dough and the date it was frozen on the outside of the package.
•When you are ready to bake, simply let the dough defrost in the refrigerator. This will take several hours, so plan ahead.
Thursday, September 8, 2011
Cassoulet
I've read through the Cassoulet recipes in Mastering the Art of French Cooking but have been intimidated by ingredients such as "goose". If anyone ever knows where to find this meat, you drop me a note :D There are other things (depending on the recipe) like "duck comfit" which is like a duck preserve (what!!?).
I do love the whole concept of Cassoulet though. If you read about the history of Cassoulet (this article is very enlightening: http://www.cliffordawright.com/caw/food/entries/display.php/topic_id/8/id/104/) you will see that it allows for great variation. And I LOVE that!
If you go to this page (Food Network), you will see the recipe that I ... uhm ... DIDN'T follow.
What I have loved about Mastering the Art of French Cooking by Julia Child et. al. is that it teaches you TECHNIQUE . So you start being able to apply the basic techniques of braising or making stews to a wide variety of dishes.
Here are the thoughts that guided MY version of this recipe.
Keep the mirepoix in the pot (remember I'm using my Le Creuset casserole), layer the bacon over, then add the chicken. Try to keep them in one layer. Sprinkle with the "Essence" as indicated in the original Food Network recipe. I didn't want to make it too spicy for the kids, so used half the cayenne pepper. Hubby just added some Tabasco to the final dish and loved it. (Note: I didn't have onion or garlic powder so left this out but the final spice mix was still great.) Then sprinkle with flour. Lift, turn and turn back the pieces of chicken so the some of this spice and flour covers the bacon and veg below. Now add the browned meat and sprinkle with Essence and flour. Stir through the meat pieces to cover them well.
NOTE on the beans. In the morning I placed the raw beans in a large pot, covered well with cold water (about 2 cm's above them). Do NOT add salt. Salt and acids (e.g. tomato, vinegar etc) can make the bean husks go hard so add any additional salt at the END of your dish's cooking time. Place this on a stove and heat the water until it starts boiling. Let it boil for 5 minutes. Then turn off the stove, remove the pot and let the beans soak for 1 hour. I just let it stand like this until I needed them (which was about 2 hours later). DRAIN THEM before using in the recipe.
Carrying on: Top the meat in the casserole with beans, add the water and red wine as I mentioned in my bullet above. Make sure it comes to a bubble on the stove top before moving to the oven.
I covered my casserole with a sheet of foil before placing the lid on top (helps keep evaporation down). Since the pot was filled so much, I placed the whole casserole inside a metal baking dish to catch any overflow (which it did).
Place in a 160 Celsius oven.
After one hour, add the sliced Chorizo, make sure they're nice and covered by the liquid. Push them into the dish with a spoon.
Cook the dish for another 1.5 hours and make sure the beans are cooked before doing the last step.
Remove the dish from the casserole into an open dish. (Glass, ceramic, etc). You must be able to spread the meat and beans nicely. Cover with the cheese/crumb/parsley mixture and grill for 10 minutes as per the original recipe.
The Verdict?
I managed to snatch this pic before it was gone:
 The dinner guests loved it but more importantly, the kids loved it and so did Dad. He said he didn't know what to make of this dish. Every bite tasted like another dish but as a whole it's fantastic too (especially with his added Tobasco*grin*). We had it with crusty white bread (which got dipped into the sauces LOL) and Polenta.
I do love the whole concept of Cassoulet though. If you read about the history of Cassoulet (this article is very enlightening: http://www.cliffordawright.com/caw/food/entries/display.php/topic_id/8/id/104/) you will see that it allows for great variation. And I LOVE that!
If you go to this page (Food Network), you will see the recipe that I ... uhm ... DIDN'T follow.
What I have loved about Mastering the Art of French Cooking by Julia Child et. al. is that it teaches you TECHNIQUE . So you start being able to apply the basic techniques of braising or making stews to a wide variety of dishes.
Here are the thoughts that guided MY version of this recipe.
- I looked at the recipe from the Food Network, and thought "hey, I could apply the technique for making bœuf bourguignon and just use these other ingredients.
- Veal shanks? Veal = Red meat = Beef. There we go. I used a packet of stewing beef with bone since (a) it's cheaper and (b) the bones add great flavor.
- I don't know how "white" beans can be "navy beans" (OK, he's got a link to explain it) but I just used white haricot beans which is what is used a lot in other recipes. The great thing about haricot beans is that it absorbes the flavors from the rest of the dish and provides fantastic protein without messing up the taste of the dish. (It's what "bake beans" are made of.)
- 10 cups water? Well, that depends on the size of your dish. And I really can not cook something like this without red wine. I used my large Le Creuset (heirloom) pot and trust me, I filled this thing to the top. The water I added (unmeasured) was just enough to start covering all the ingredients and then I topped it up further with red wine.
- I'm also thinking, where would I get "ham hocks" from? On second thought, Ham = Pig = Bacon. Voila, we're using fatty bacon.
- The shop where I did my grocery shopping didn't have fancy sausages but it did have great Chorizo, so that went in.
- And then, for a great twist, I added CHICKEN. Yep, chicken. 6 chicken thighs, and 2 drum sticks. Because I had some. Don't you just love these "peasant stews" that are made up from whatever you have available?
Keep the mirepoix in the pot (remember I'm using my Le Creuset casserole), layer the bacon over, then add the chicken. Try to keep them in one layer. Sprinkle with the "Essence" as indicated in the original Food Network recipe. I didn't want to make it too spicy for the kids, so used half the cayenne pepper. Hubby just added some Tabasco to the final dish and loved it. (Note: I didn't have onion or garlic powder so left this out but the final spice mix was still great.) Then sprinkle with flour. Lift, turn and turn back the pieces of chicken so the some of this spice and flour covers the bacon and veg below. Now add the browned meat and sprinkle with Essence and flour. Stir through the meat pieces to cover them well.
NOTE on the beans. In the morning I placed the raw beans in a large pot, covered well with cold water (about 2 cm's above them). Do NOT add salt. Salt and acids (e.g. tomato, vinegar etc) can make the bean husks go hard so add any additional salt at the END of your dish's cooking time. Place this on a stove and heat the water until it starts boiling. Let it boil for 5 minutes. Then turn off the stove, remove the pot and let the beans soak for 1 hour. I just let it stand like this until I needed them (which was about 2 hours later). DRAIN THEM before using in the recipe.
Carrying on: Top the meat in the casserole with beans, add the water and red wine as I mentioned in my bullet above. Make sure it comes to a bubble on the stove top before moving to the oven.
I covered my casserole with a sheet of foil before placing the lid on top (helps keep evaporation down). Since the pot was filled so much, I placed the whole casserole inside a metal baking dish to catch any overflow (which it did).
Place in a 160 Celsius oven.
After one hour, add the sliced Chorizo, make sure they're nice and covered by the liquid. Push them into the dish with a spoon.
Cook the dish for another 1.5 hours and make sure the beans are cooked before doing the last step.
Remove the dish from the casserole into an open dish. (Glass, ceramic, etc). You must be able to spread the meat and beans nicely. Cover with the cheese/crumb/parsley mixture and grill for 10 minutes as per the original recipe.
The Verdict?
I managed to snatch this pic before it was gone:

Friday, September 2, 2011
Meringues
I love to make Creme Brulee as a treat and use this recipe which is easy and comes out fabulous. But this leaves me with 8 egg whites! So the obvious thing to do is Meringue!
This Meringue recipe comes from the classic book "Cook and Enjoy". First is the original measurements followed by the adjustment for 8 egg whites.
3 egg whites
pinch salt
1/4 teaspoon cream of tartar
1 cup castor sugar
1/2 teaspoon vanilla essence
Preheat oven to 120 Celsius.
Beat egg whites with the salt and cream of tartar until stiff but not dry
Add the castor sugar by the spoonful, beat well after each addition.
Add the vanilla essence just before the last two spoons of castor sugar.
Line a baking sheet with butter / baking paper.
Shape the meringues on the paper with a spoon or use an icing bag and tube.
Bake for 50 minutes to 1 hour and lift meringues off paper with a spatula.
-------------------------------------------------
Adjustment:
8 egg whites
2 -3 pinches salt
2.5 ml cream of tartar
2.5 cups castor sugar
6.5ml vanilla essence
(Method is the same)
Sunday, July 17, 2011
Saturday, July 16, 2011
Poulet Poché au Vin Blanc, Gratiné
So what does Poulet Poché au Vin Blanc, Gratiné (Chicken poached in white wine, herbs and aromatic vegetables, then Gratinéed with Cheese Sauce) look like?
(I do not aim to copy the recipe here. Can be found in Mastering the Art of French Cooking)
In this first (blurry) picture, I have just added the liquid (1 cup dry white wine + 1.5 cup chicken stock) to the chicken and butter-braised onions & carrots. About 5 sprigs each of thyme and parsley are your herbs (you can also add a bay leaf):
![]()
(I do not aim to copy the recipe here. Can be found in Mastering the Art of French Cooking)
In this first (blurry) picture, I have just added the liquid (1 cup dry white wine + 1.5 cup chicken stock) to the chicken and butter-braised onions & carrots. About 5 sprigs each of thyme and parsley are your herbs (you can also add a bay leaf):

Once the chicken is done, you remove it from the pan / casserole and place in a buttered (optional) glass dish. I covered it with foil but you do not have to keep it warm at this stage since the last step in the dish will heat it up.
Pour all the liquid through a sieve into a stainless steel pot. Heat up to boil and skim any foam off. Keep boiling while making the roux and velouté.
Create a 'roux'
In a seperate pot, melt 1.75oz of butter until bubbling but not browning. Add 1oz flour and stir well. Let it bubble for about 2 minute, stirring continually (lift pot from heat if it threatens to brown the roux.
Make the 'velouté '
Pour all the boiling stock into the roux and whisk vigorously with a whisk (remember to use a silicone one if you have a non-stick pot!). Place over low heat and keep whisking as the sauce thickens.
Turn your 'velouté' into a Sauce Mornay
Add about 1.5 oz of coarsely grated Gruyère cheese to the sauce and stir until well mixed. Pour sauce over the chicken.
Sprinkle another 1.5 oz (or more to taste) of cheese over the top and place under a hot grill (if the chicken was still warm). If the chicken was cold you need to put it into an oven, preheated to 375F for 25 - 30 minutes until the dish is bubbling nicely. (Careful not to re-cook the dish as it will dry out the chicken - especially if you have white meat pieces).
Here's the final dish:
![]()

Monday, July 11, 2011
Cake: Israelites through the Red Sea
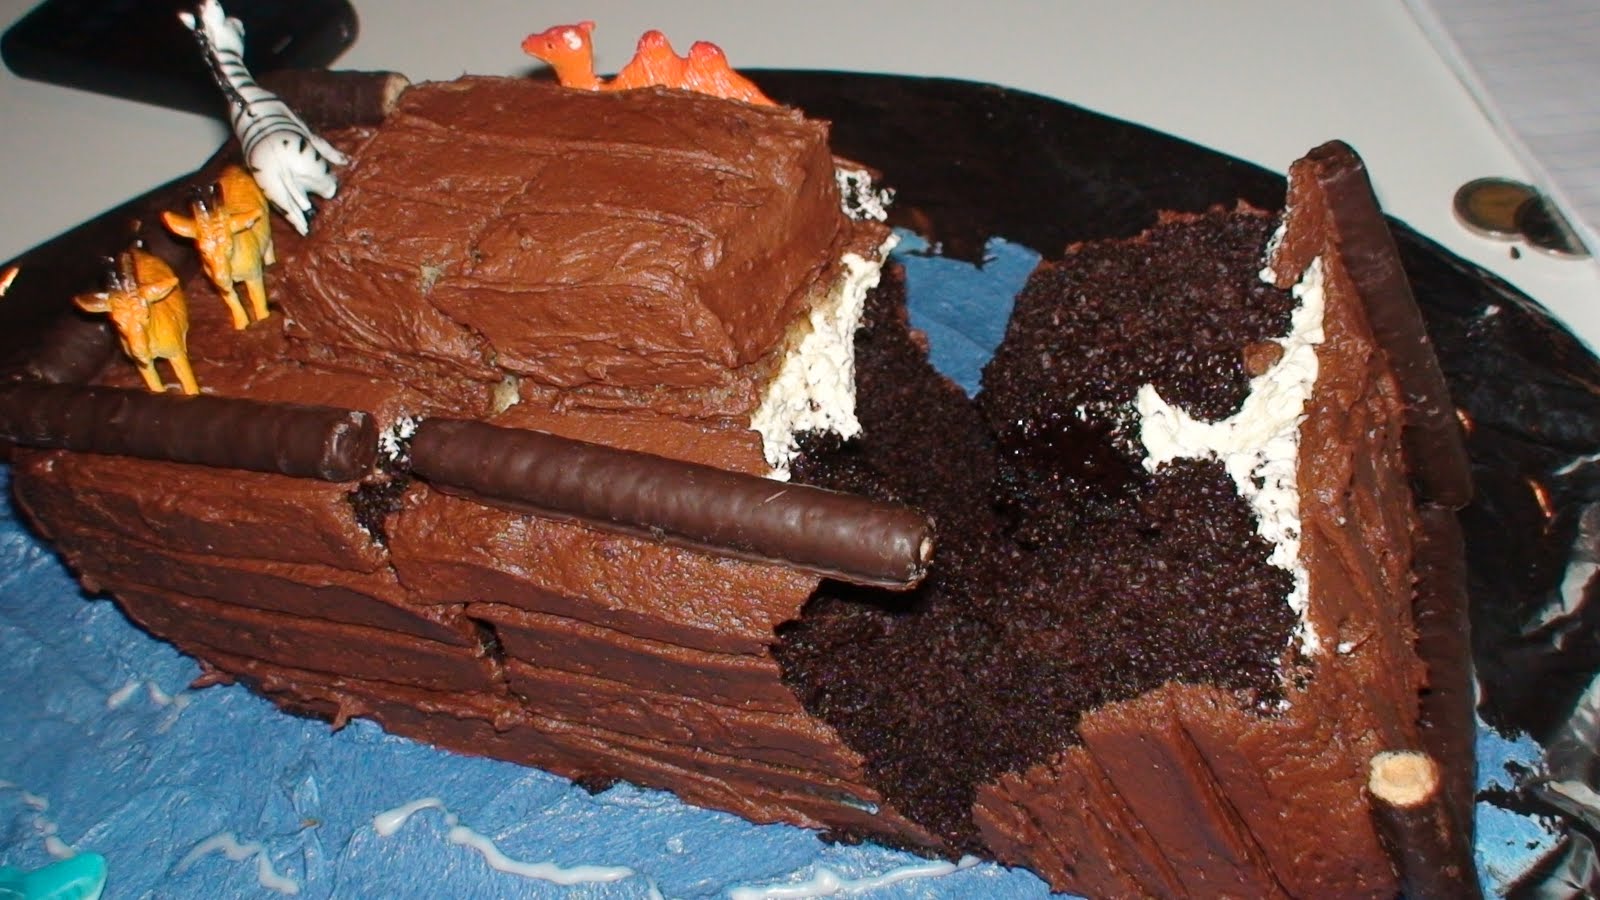
I made this cake a while back for the Friday play group. The story for the day was the parting of the Red Sea and voila! a very easy cake.

I first put a layer of icing glaze (icing sugar mixed with water) along where the middle would be and then positioned the two halves of the cake on both sides.
The inside edges of each side was cut down with a knife. It was iced with blue-colored butter icing and some icing glazed was used to pipe along the ridges to simulate waves. I crushed some biscuits and sprinkled them on the glaze in the open area for 'sand'. Little jelly-babies made up the 'Israelites'. And just for something extra for the kids I lined up marshmallow fish around the outside.
Strawberry and cream tart
I haven't been posting here for a while since my newest hobby (cardmaking) has taken up pretty much most of my spare time. See www.redcardcorner.blogpost.com).
But I do want to share with anyone who manages to stumble over this blog, a delicious, decadent and extremely easy tart.
NOTE: best made day before!!
Ingredients:
500ml whipping cream
1 standard tin strawberry jam
2-3 packets Tennis (square coconut) biscuits
Method:
Whip the cream until nice and stiff. Be careful to overwhip so it doesn't turn into butter :-)
You want it in a nice spreadable consistency.
Empty the tin of strawberry jam in a bowl and soften with a spoon.
Add the jam to the whipped cream and fold in well with a spatula.
In a rectangular glass dish, spread a very thin layer of the cream filling in the bottom.
Place one layer of biscuits on top. (break some biscuits as needed to make sure most of the cream layer is covered.
Add a layer of cream on top, enough to cover the biscuits.
Place another layer of biscuits and cream. Repeat as needed and end with a cream layer.
I usually have three biscuit layers.
Keep in the fridge at least over night. Serve COLD.
OPTIONAL:
sprinkle each layer of biscuits with sherry before putting a cream layer.
Wednesday, May 11, 2011
Tip: Water on hand
I have found that having one or two water bottles with 'pull-out' lids to be quite handy in the kitchen. When you just need to add a squirt of water to a dish this is very useful since you won't put too much at once. I also use it to add water to the kids' tea to cool it down.
Friday, April 22, 2011

Sunday, March 20, 2011
Nicole's Brownies
Got this brilliant, sticky, crunchy brownie recipe from a friend:
100g butter
50g cocoa powder
2 eggs
225g castor sugar
1 tsp vanilla essence
50g self-raising flour
100g slab chocolate (I like using the one with hazelnuts) - roughly chopped
Spray a square (+/- 23cm) tin or glass dish with non-stick spray.
Pre-heat oven to 180C
Melt the butter in the microwave (careful not to boil it). Add the cocoa powder and mix well until no lumps are left.
Beat the eggs and add the castor sugar. Beat well until the mixture is light yellow and fluffy. Ad the cocoa mixture to the eggs and sugar and add the vanilla essence. Sift in the flour (yes it's 0nly 50g self-raising) and add the chocolate bits last.
Pour into the dish and slightly flatten with a spatula. Mixture is slightly stiff. Bake for 25-30 mins.
Can be served within 5-10 minutes with vanilla ice cream but is also delicious the next day as a crumbly, sticky, crunchy brownie :D
ENJOY!
Thanks Nicole!
Saturday, February 19, 2011
Flower garden cake
It is "baby" sister's birthday today and she asked for a cake! Here's the flower garden idea from http://familyfun.go.com/recipes/flower-power-cake-685974/
For the 'flowers' I bought small ready-made cupcakes from Pick n Pay, removed the paper wrapping, cut the bottom half off and in the case of the pink ones, removed the icing and re-iced with my own pink butter icing. They are then decorated with all kinds of sweets to your heart's desire.
Little tip: Place the cake on top of pretty, good quality and waxy gift wrap paper. Tuck waxy baking paper in along the sides BEFORE you start icing to catch the 'overflow' and then just gently pull the wax paper out when finished. This protects the bottom paper.
A sweet and easy success.


Friday, February 18, 2011
Moist or Pretty - You pick
BEFORE:

AFTER:


It seems you can either have a moist cake (and plain) or a pretty cake (and stale)... I'm definately planning on doing more research on this! Cake was baked on Wednesday, cut on Thursday afternoon, built and iced on Thursday evening, and fell apart by Friday morning!
AFTER:
I piped some more chocolate icing on the one end and glued the piece back and am now propping the two sides up with muffins ;) Dear Daughter does not seem to mind. She says she LOVES IT :D
I do wonder what Cake Boss's cakes actually taste like!
Thursday, February 10, 2011
A little something different: Decor for Valentines
Something to go with that special Valentine's dinner? We made these paper heart chandelliers for dear Daughter's 4th birthday which conveniently falls in February :) She wanted a heart-themed birthday (see cake on previous post).


Monday, February 7, 2011
Stuffed Artichokes
The first time I had artichokes was about 9 years ago. Since that time I had always looked out for them but could never find any. And then I saw them this artichoke season at Woolworths. Hubby was ecstatic. I'm not one for repeating something that was already said well enough by others so pardon the links:

How to cook and eat an artichoke from the pages of simplyrecipes.com
The only difference we do is that we stuff it.
It has been suggested that you steam the artichokes for HALF the time, let them cool, then stuff them and complete the steaming until the leaves are loose.
IMPORTANT NOTE: Before you start steaming them, hold them by the stalk, and point the head down and give it a couple of hard knocks on the preparation surface. It will loosen the leaves for stuffing later. My kids loved doing this :)
Our stuffing (enough for 2 artichokes):
- Bread crumbs from 4 pieces of dried bread (dry white bread in toaster on lowest setting, cool, cut off crusts and put in food blender until fine crumbs)
- One packet of parma ham (about 5 thin slices) - cut into small pieces (you can even then add it to the blender with the crumbs. It mixes it nicely.
- 1 tsp chopped garlic (or more to taste)
- 1/2 - 3/4 cup grated parmesan or we prefer something like provolone or pecorino.
- A little freshly ground black pepper
- Pinch of salt
Stuff this into the inside of each of the larger artichoke leaves:
Place the artichokes upright into a heavy-base pot (preferably one that can also go into the oven) and finish steaming them.
TIP: put a bay leaf into the water. It gives the artichokes a beautiful aroma.

When you finished steaming them (in total I gave them 50min - 1hr), you put them in the oven under a hot grill and quickly grill the tops. It makes the top of the stuffing nice and crispy.
NOTE: These CAN be made in advance and heated in the microwave. Works like a charm.
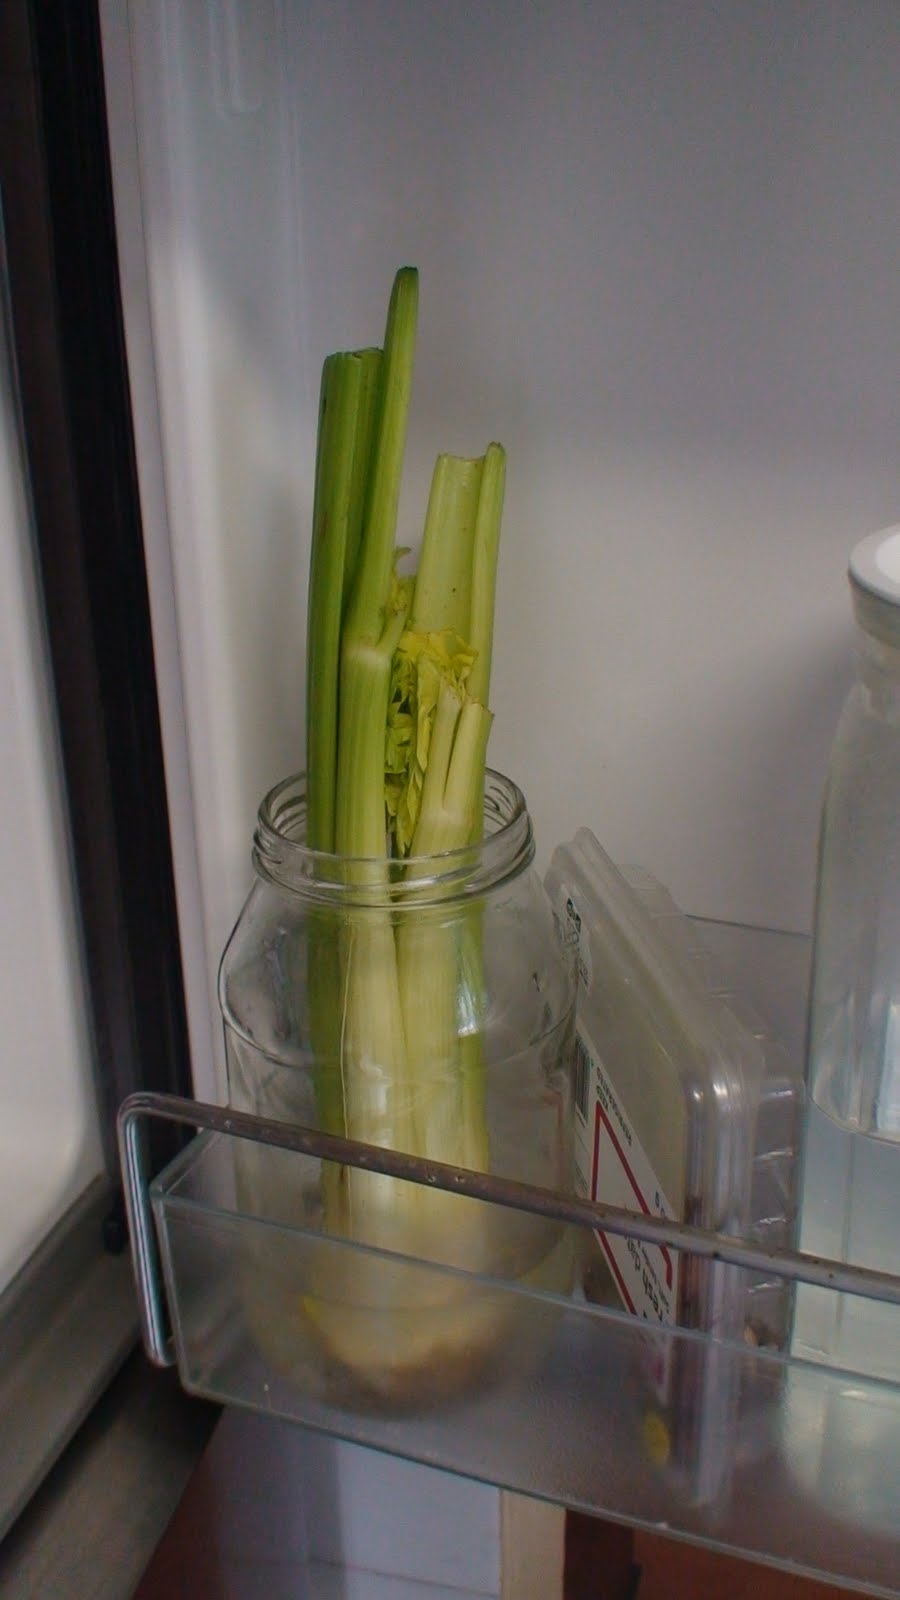
Treasures from Larousse Gastronomique - Storing Celery
My younger sister gave me a huge gift, the Larousse Gastronomique . It is THE encyclopaedia on all things food, cooking and anything related to it. If I come across some particularly interesting tips / info / useless information I'll post it here :)
For e.g.: The best way to store Celery is in the fridge in a bottle with water to which a little salt is added. This keeps it from wilting quickly. (I did remove the leaves since they would wilt first, but remember that they are great in soups.)
Isabel's 4th birthday (and my 2nd 'made it myself birthday-cake)

Since last year Isabel has asked me for a heart cake that she saw in the same book from which I made Gabriel's train cake. It's basically one normal round cake and one square cake of the same dimensions. The round cake is then cut in half which forms the two rounds of the heart which nesstles agains two sides of the square cake.
The only square dish / pan I had was a glas dish but it was way too shallow, so I made a "collar" from baking paper to heighten the sides. Worked like a charm.
It was a great success and tasted great (thanks to the Woollies box cake which works out perfectly)
Subscribe to:
Posts (Atom)